Yesterday evening John and I met up at
Maelstrom Games and played a mission we have been planning for a few weeks. We would use
Bag the Hun to re-fight the
Operation Vengeance mission to take out Japanese Admiral Isoroku Yamamoto.
The US Army Airforce would field a flight of four P38-G Lightnings
The Japanese Naval Airforce would field a two Shoktai of three Mitsubishi A6M2 Zero escorting two Mitsubishi G4M2 Betty. The US player would not know which Betty contained the Admiral.
The record sheets are at the end of the post.
The card deck comprised:
- Two Junior Ace Cards
- Allied Section 1 Move
- Allied Section 1 Fire
- Allied Section 1 Leader
- Allied Formation Bonus Card
- Axis Section 1 Move
- Axis Section 1 Fire
- Axis Section 1 Leader
- Axis Section 2 Move
- Axis Section 2 Fire
- Axis Section 2 Leader
- Bombers Move
- Bombers Fire
- Axis Formation Bonus Card
- Altitude Bonus Card
- No Fuel to Duel - would apply to the Allies only
We randomised who would take which side and I would be playing the USAAF.
The USAAF were soon into the action sweeping towards the Japanese, Hines scored early long range hits on the first Betty severing the fuel line and setting the bomber aflame. The Betty soon extinguished the flames and limps towards the airport at Buin while the swirling dogfight commences.
The first Shoktai of Zeroes were soon on the tails of Lanphier and Holmes. Lanphier shook off Morisaki but Holmes was unable to shake Tsujinoue. A burst from the Zero ruptured Holmes' fuel line and the P-38 caught fire, Holmes took a sharp dive and the fire was extinguished. Diving, weaving and climing, Holmes was still unable to break away from Tsujinoue who finished off his aircraft. Holmes crashed into the jungle and no parachute was seen.
Having shaken off his tail, Lanphier was soon closing on the second Betty. Lanphier fired a burst into the the Betty but to no effect, the rear gunner on the Betty was much more tenacious although Lanphiers' aircraft did not take significant damage he was still forced to shear away.
Barber takes light damage from the bombers gunners and is also hit by Yoshimi Hidakas Zero but takes no significant damage. Barber gets behind Kenji Yanagiyas Zero and sends a burst through the cockpit, Yanagiya slumps dead over the controls and the Zero crashes into the jungle. Unfortunately, Barbers guns are jammed.
The melee continues, Lanphier gets onto the tail of the first Betty, but Morisaki gets onto Lanphiers tail. Trying to intervene, Hine gets onto the tail of Morisakis' Zero, and a controlled burst causes the Zero to break up in mid-air. Free off his pursuer, Lanphier presses the fire button and a controlled burst rips through the Betty which explodes in a ball of flame, no chutes are seen.
One of the Bettys is down, but a P-38 is lost, can the other Betty be taken out.
At tree-top height, Hidaka locked onto the tail of Hine and a burst from the Zero took out the starboard engine, struggling to regain control Hines P-38 was forced to crash land in the jungle but he was picked up by natives and made his way back to friendly lines.
Only two P-38 remain to take on the remaining four Zeroes and to take out the remaining Betty. Fortunately the Zeros have been drawn away by the two lost P-38s and the Betty is limping along leaking fuel from the severed fuel line damaged caused by Hine.
Both Lanphier and Barber raced after the final Betty and both were soon on the tail. Lanphiers P-38 took a hit from the tail gunner and lost control of his aircraft shearing off to the port. Barber stayed on the Betty firing rounds into the Betty but causing little damage due to his jammed guns.
Having regained control Lanphier again locks onto the Betty, but like Barber is unable to score a decisive hit. Running out of ammunition, and with the Betty on final approach to Buin airport the P-38s break off and head for home, dodging the scattered Zeroes.
The surviving Betty arrived at Buin, but Yamamoto did not disembark, he had been in the Betty that had exploded over the Bougainville jungle.
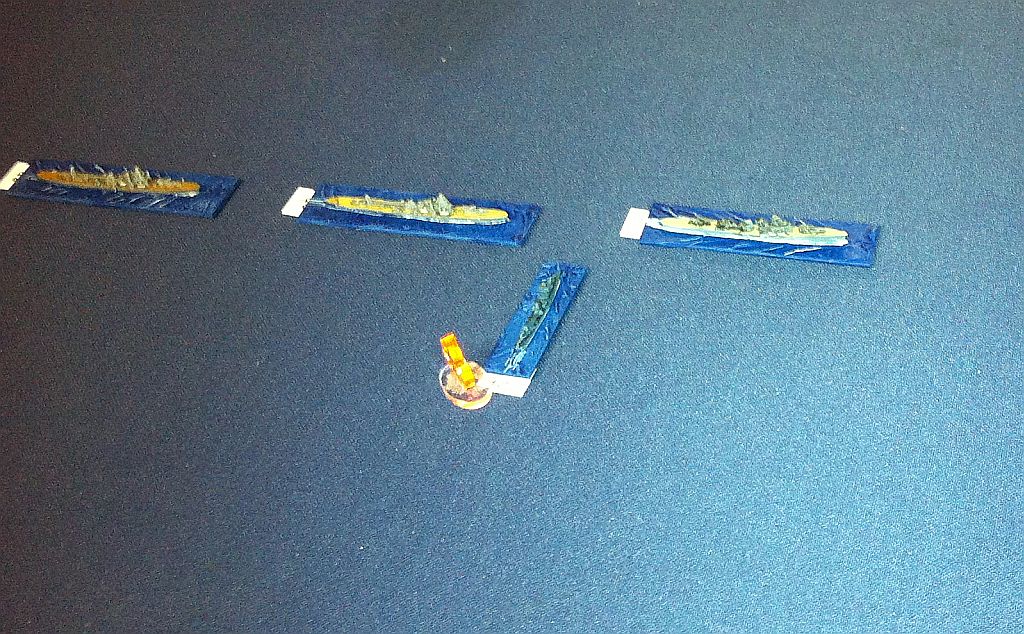
Here are some images from the game, the aircraft are all from Tumbling Dice from the collection of John and myself.
 |
| The USAAF P-38s |
 |
| The Japanese Naval forces |
 |
| Initial engagements, Hine scores the first hit on the Betty at long range |
 |
| Two P-38 try to draw off the Zeroes while the other two try to take out the Bettys |
 |
| Morisaki on the tail of Lanphier who soon shakes him off |
 |
| Tsujinoue pumps fire into Holmes stricken P-38G |
 |
| Yaamotos Betty explodes in flames |
 |
| Lanphier and Barber try to finish off the second Betty before it arrives at Buin airfield |
Type: N. American P-38G ID: 1-1
8
|
Basic Speed
|
2
|
Rate Of Climb
|
4
|
Manoeuvrability
|
3*
|
Robustness
|
6
|
Altitude
|
1
|
Size
|
Pilot Name: Thomas G. Lanphier, Jr.
|
Rank: Captain
|
|
Number of kills at start of game
|
|
Top Ace (+2 luck)
|
X
|
Junior Ace (+1 luck)
|
|
Veteran (+1 luck on flying tests only)
|
|
Regular (no luck bonus)
|
|
Sprog (-1 luck)
|
Fire Factor
|
11
|
Front
|
-
|
Rear
|
-
|
Right
|
-
|
Left
|
Seconds of ammunition remaining
|
Fr
|
1
|
2
|
3
|
4
|
5
|
6
|
7
|
8
|
9
|
10
|
11
|
12
|
13
|
14
|
15
|
16
|
-
|
-
|
-
|
-
|
Notes:
Type: N. American P-38G ID: 1-2
8
|
Basic Speed
|
2
|
Rate Of Climb
|
4
|
Manoeuvrability
|
3*
|
Robustness
|
6
|
Altitude
|
1
|
Size
|
Pilot Name: Besby F. Holmes
|
Rank: 1st Lt.
|
|
Number of kills at start of game
|
|
Top Ace (+2 luck)
|
|
Junior Ace (+1 luck)
|
X
|
Veteran (+1 luck on flying tests only)
|
|
Regular (no luck bonus)
|
|
Sprog (-1 luck)
|
Fire Factor
|
11
|
Front
|
-
|
Rear
|
-
|
Right
|
-
|
Left
|
Seconds of ammunition remaining
|
Fr
|
1
|
2
|
3
|
4
|
5
|
6
|
7
|
8
|
9
|
10
|
11
|
12
|
13
|
14
|
15
|
16
|
-
|
-
|
-
|
-
|
Notes:
Type: N. American P-38G ID: 1-3
8
|
Basic Speed
|
2
|
Rate Of Climb
|
4
|
Manoeuvrability
|
3*
|
Robustness
|
6
|
Altitude
|
1
|
Size
|
Pilot Name: Rex T. Barber
|
Rank: 1st Lt.
|
|
Number of kills at start of game
|
|
Top Ace (+2 luck)
|
X
|
Junior Ace (+1 luck)
|
|
Veteran (+1 luck on flying tests only)
|
|
Regular (no luck bonus)
|
|
Sprog (-1 luck)
|
Fire Factor
|
11
|
Front
|
-
|
Rear
|
-
|
Right
|
-
|
Left
|
Seconds of ammunition remaining
|
Fr
|
1
|
2
|
3
|
4
|
5
|
6
|
7
|
8
|
9
|
10
|
11
|
12
|
13
|
14
|
15
|
16
|
-
|
-
|
-
|
-
|
Notes:
Type: N. American P-38G ID: 1-4
8
|
Basic Speed
|
2
|
Rate Of Climb
|
4
|
Manoeuvrability
|
3*
|
Robustness
|
6
|
Altitude
|
1
|
Size
|
Pilot Name: Raymond K. Hine
|
Rank: 1st Lt.
|
|
Number of kills at start of game
|
|
Top Ace (+2 luck)
|
|
Junior Ace (+1 luck)
|
X
|
Veteran (+1 luck on flying tests only)
|
|
Regular (no luck bonus)
|
|
Sprog (-1 luck)
|
Fire Factor
|
11
|
Front
|
-
|
Rear
|
-
|
Right
|
-
|
Left
|
Seconds of ammunition remaining
|
Fr
|
1
|
2
|
3
|
4
|
5
|
6
|
7
|
8
|
9
|
10
|
11
|
12
|
13
|
14
|
15
|
16
|
-
|
-
|
-
|
-
|
Notes:
Type: Mitsubishi A6M2 Zero ID: 1-1
7
|
Basic Speed
|
2
|
Rate Of Climb
|
6*
|
Manoeuvrability
|
1
|
Robustness
|
6
|
Altitude
|
1
|
Size
|
Pilot Name: T.Morisaki
|
Rank: Lt(JG).
|
|
Number of kills at start of game
|
|
Top Ace (+2 luck)
|
|
Junior Ace (+1 luck)
|
X
|
Veteran (+1 luck on flying tests only)
|
|
Regular (no luck bonus)
|
|
Sprog (-1 luck)
|
Fire Factor
|
7
|
Front
|
-
|
Rear
|
-
|
Right
|
-
|
Left
|
Seconds of ammunition remaining
|
Fr
|
1
|
2
|
3
|
4
|
5
|
6
|
7
|
8
|
9
|
10
|
11
|
12
|
13
|
14
|
-
|
-
|
-
|
-
|
-
|
-
|
Notes:
Tailing aircraft get -1 to stay on tail in a Break Turn
Type: Mitsubishi A6M2 Zero ID: 1-2
7
|
Basic Speed
|
2
|
Rate Of Climb
|
6*
|
Manoeuvrability
|
1
|
Robustness
|
6
|
Altitude
|
1
|
Size
|
Pilot Name: T.Tsujinoue
|
Rank: PO 1/C
|
|
Number of kills at start of game
|
|
Top Ace (+2 luck)
|
|
Junior Ace (+1 luck)
|
|
Veteran (+1 luck on flying tests only)
|
X
|
Regular (no luck bonus)
|
|
Sprog (-1 luck)
|
Fire Factor
|
7
|
Front
|
-
|
Rear
|
-
|
Right
|
-
|
Left
|
Seconds of ammunition remaining
|
Fr
|
1
|
2
|
3
|
4
|
5
|
6
|
7
|
8
|
9
|
10
|
11
|
12
|
13
|
14
|
-
|
-
|
-
|
-
|
-
|
-
|
Notes:
Tailing aircraft get -1 to stay on tail in a Break Turn
Type: Mitsubishi A6M2 Zero ID: 1-3
7
|
Basic Speed
|
2
|
Rate Of Climb
|
6*
|
Manoeuvrability
|
1
|
Robustness
|
6
|
Altitude
|
1
|
Size
|
Pilot Name: Soichi Sugita
|
Rank: F 1/C
|
|
Number of kills at start of game
|
|
Top Ace (+2 luck)
|
|
Junior Ace (+1 luck)
|
|
Veteran (+1 luck on flying tests only)
|
X
|
Regular (no luck bonus)
|
|
Sprog (-1 luck)
|
Fire Factor
|
7
|
Front
|
-
|
Rear
|
-
|
Right
|
-
|
Left
|
Seconds of ammunition remaining
|
Fr
|
1
|
2
|
3
|
4
|
5
|
6
|
7
|
8
|
9
|
10
|
11
|
12
|
13
|
14
|
-
|
-
|
-
|
-
|
-
|
-
|
Notes:
Tailing aircraft get -1 to stay on tail in a Break Turn
Type: Mitsubishi G4M2 Betty ID: B1
5
|
Basic Speed
|
1
|
Rate Of Climb
|
1
|
Manoeuvrability
|
4*
|
Robustness
|
5
|
Altitude
|
5
|
Size
|
Pilot Name:
|
Rank:
|
|
Number of kills at start of game
|
|
Top Ace (+2 luck)
|
|
Junior Ace (+1 luck)
|
|
Veteran (+1 luck on flying tests only)
|
|
Regular (no luck bonus)
|
|
Sprog (-1 luck)
|
Fire Factor
|
4
|
Front
|
3
|
Rear
|
3
|
Right
|
4
|
Left
|
Type: Mitsubishi A6M2 Zero ID: 1-1
7
|
Basic Speed
|
2
|
Rate Of Climb
|
6*
|
Manoeuvrability
|
1
|
Robustness
|
6
|
Altitude
|
1
|
Size
|
Pilot Name: Yoshimi Hidaka
|
Rank: CPO
|
|
Number of kills at start of game
|
|
Top Ace (+2 luck)
|
|
Junior Ace (+1 luck)
|
X
|
Veteran (+1 luck on flying tests only)
|
|
Regular (no luck bonus)
|
|
Sprog (-1 luck)
|
Fire Factor
|
7
|
Front
|
-
|
Rear
|
-
|
Right
|
-
|
Left
|
Seconds of ammunition remaining
|
Fr
|
1
|
2
|
3
|
4
|
5
|
6
|
7
|
8
|
9
|
10
|
11
|
12
|
13
|
14
|
-
|
-
|
-
|
-
|
-
|
-
|
Notes:
Tailing aircraft get -1 to stay on tail in a Break Turn
Type: Mitsubishi A6M2 Zero ID: 1-2
7
|
Basic Speed
|
2
|
Rate Of Climb
|
6*
|
Manoeuvrability
|
1
|
Robustness
|
6
|
Altitude
|
1
|
Size
|
Pilot Name: Yasushi Okazaki
|
Rank: PO 2/C
|
|
Number of kills at start of game
|
|
Top Ace (+2 luck)
|
|
Junior Ace (+1 luck)
|
|
Veteran (+1 luck on flying tests only)
|
X
|
Regular (no luck bonus)
|
|
Sprog (-1 luck)
|
Fire Factor
|
7
|
Front
|
-
|
Rear
|
-
|
Right
|
-
|
Left
|
Seconds of ammunition remaining
|
Fr
|
1
|
2
|
3
|
4
|
5
|
6
|
7
|
8
|
9
|
10
|
11
|
12
|
13
|
14
|
-
|
-
|
-
|
-
|
-
|
-
|
Notes:
Tailing aircraft get -1 to stay on tail in a Break Turn
Type: Mitsubishi A6M2 Zero ID: 1-3
7
|
Basic Speed
|
2
|
Rate Of Climb
|
6*
|
Manoeuvrability
|
1
|
Robustness
|
6
|
Altitude
|
1
|
Size
|
Pilot Name: Kenji Yanagiya
|
Rank: F 1/C
|
|
Number of kills at start of game
|
|
Top Ace (+2 luck)
|
|
Junior Ace (+1 luck)
|
|
Veteran (+1 luck on flying tests only)
|
|
Regular (no luck bonus)
|
X
|
Sprog (-1 luck)
|
Fire Factor
|
7
|
Front
|
-
|
Rear
|
-
|
Right
|
-
|
Left
|
Seconds of ammunition remaining
|
Fr
|
1
|
2
|
3
|
4
|
5
|
6
|
7
|
8
|
9
|
10
|
11
|
12
|
13
|
14
|
-
|
-
|
-
|
-
|
-
|
-
|
Notes:
Tailing aircraft get -1 to stay on tail in a Break Turn
Type: Mitsubishi G4M2 Betty ID: B2
5
|
Basic Speed
|
1
|
Rate Of Climb
|
1
|
Manoeuvrability
|
4*
|
Robustness
|
5
|
Altitude
|
5
|
Size
|
Pilot Name:
|
Rank:
|
|
Number of kills at start of game
|
|
Top Ace (+2 luck)
|
|
Junior Ace (+1 luck)
|
|
Veteran (+1 luck on flying tests only)
|
|
Regular (no luck bonus)
|
|
Sprog (-1 luck)
|
Fire Factor
|
4
|
Front
|
3
|
Rear
|
3
|
Right
|
4
|
Left
|